Step by Step MM-CIN Training Documentation
Topics covered:
1. Excise Transactions
2. Capital Goods Purchase
3. Returnable/ Non
Returnable Gate Pass
4. Import Purchase Cycle
5. Vendor Return &
Excise Reversal
1 COUNTRY INDIA VERSION
1.1 Procedure for Claiming CENVAT for Raw
Materials
1.1.1 Create the Purchase Order (ME21N)
Follow standard PO creation process
1.1.2 Gate Entry (/cvs/gnt01)
Enter the PO No in the Field, and then all the
items against the Po will be shown. Enter the Relevant Quantity, Enter the LR
no, Vehicle No, Vendor Excise No, In the Text Enter the Transporter Name.
Security ID Select from the Drop Down Menu.
Menu Path: Logistics à Materials Management à Inventory management àGoods movement à goods receipt à for purchase orderà Purchase order no.
Known (MIGO)
a. Enter the PO number and click on Execute button as shown below.
b. Enter the Gate Entry No
It will show the gate Entry Quantity of the in the Quantity tab in field
Quantity in Unit of entry.
c. Enter receiving Storage Location in Where tab. Here check the stock type in which material is going to receive. If some text needs to be added regarding the goods receipt enter it in Text field. If it subjected to batch Management then enter the Vendor Batch No as well as In-house batch no. If you want to Split the Quantity then Click on, Then Enter the Batch, Quantity etc. After doing all these thing go to Classification Enter all the Parameter.
d. Click on Item OK
Checkbox – at this point of time system will show relevant information of
excise for which Excise Invoice tab will appear in the Header screen as shown
below, select Only Capture Excise Invoice on this tab and put the Vendor Excise
Invoice no check the Excise group.
e. Check the Excise Details
related to the received material in Excise Item tab in Detail Data screen as
shown below.
Post ![]() button
to save the Goods receipt, system will generate the Goods receipt Document.
System will automatically update the Part I register as soon as the GR is made.
button
to save the Goods receipt, system will generate the Goods receipt Document.
System will automatically update the Part I register as soon as the GR is made.
1.1.2 Post the Captured Vendor’s Excise
Invoice
Go to CIN transaction
Menu Path: User menu à Indirect taxes à Procurement à Excise invoice à Incoming Excise invoice à Individual Processing à
Capture/Display (J1IEX)
a. Select Post Excise
Invoice and Vendor in windows above the Header.
b. Enter Goods Receipt
Document number generated in STEP 2 and press ENTER or Click on Execute ![]() button.
button.
c. Following screen will appear as shown below.
d. Enter Vendor Excise
Invoice Number, Excise Invoice Date, Excise group – (or any other appropriate
excise group).
e. If material had directly came from different vendor, Enter vendor code in Ship from field in miscellaneous tab.
f. If Excise Invoice is faulty and still want to take the credit for the excise invoice, enter the rejection code.
g. Check the Material
Chapter Heading, Material type in Item tab in Detail Data screen.
h. Check the Quantity in Quantity tab
i. Check the Duty rate in Duty rate tab.

j. Check duty values and Tax amount for the material in Duty value tab.
After Check Click on Simulate Button to check
the G/L Entries.
Press save button ![]() to
post the entry, Excise Invoice will be captured and following screen for
information will be displayed.
to
post the entry, Excise Invoice will be captured and following screen for
information will be displayed.
1.1.3
Display Excise Invoice
Menu Path: User menu à Indirect taxes à Procurement à Excise invoice à Incoming Excise invoice à Individual Processing à
Change/Display/Post/Cancel (J1IEX)
Select Display and Vendor Excise Invoice in windows
above the Header. Here you can display both the Part I and Part II entries in
one document only. Check the Excise registers in which entry is made.
1.2 Procedure for claiming
CENVAT for Capital Items
1.2.1 Create the Purchase Order for Capital
goods
Follow standard PO creation process and note the following things
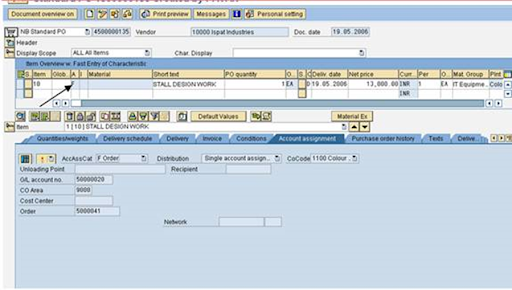
In the Account assignment category enter “F”.
The system will prompt to put the Order no as well as G/L account
no in the account assignment tab.
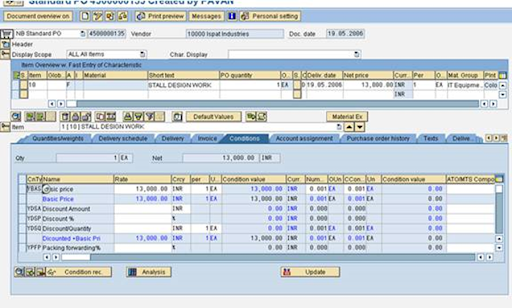
All the other details like VAT or CST you will have to maintain.
Maintain the Tax code.
The system will prompt to put the Order no as well as G/L account
no in the account assignment tab.
All the other details like VAT or CST you will have to maintain.
Maintain the Tax code.
Check the Item OK check box and press Check ![]() button
in tool bar to check the entries
button
in tool bar to check the entries
g. Press Post ![]() button
to save the Goods receipt, system will generate the Goods receipt Document.
System will automatically update the Part I register as soon as the GR is made.
button
to save the Goods receipt, system will generate the Goods receipt Document.
System will automatically update the Part I register as soon as the GR is made.
l. Press Enter, following
screen will appear
1.2.3 Post the Captured Vendor’s Excise
Invoice
Go to CIN transaction
Menu Path: User menu à Indirect taxes à Procurement à Excise invoice à Incoming Excise invoice à Individual Processing à
Capture/Display (j1iex)
a. Select Post the
Excise Invoice and Goods Receipt in windows above the Header.
b. Enter Vendor Excise no
generated above.
If material had directly came from different vendor, Enter vendor
code in Ship from field in miscellaneous tab.
a. If Excise Invoice is
faulty and still want to take the credit for the excise invoice, enter the rejection
code.
b. Check the Material
Chapter Heading, Material type in Item tab in Detail Data screen.
c. Check the Quantity in
Quantity tab
d. Check the Duty rate in
Duty rate tab.
e. Check duty values and Tax amount for the material in Duty value tab.
f. Check the Part I entries, which are created immediately after the GR in Part I tab.
h. Tick the Item OK check
box and Press ![]() button
to check the entries.
button
to check the entries.
i. Press save button ![]() to
post the entry, Excise Invoice will be captured and following screen for
information will be displayed.
to
post the entry, Excise Invoice will be captured and following screen for
information will be displayed.
1.2.4Display Excise Invoice
Menu Path: User menu à Indirect taxes à Procurement à Excise invoice à Incoming Excise invoice à Individual Processing à Change/Display/Post/Cancel
Select Display and Vendor
Excise Invoice in windows above the Header. Here you can display both the
Part I and Part II entries in one document only. Check the Excise registers in
which entry is made.
1.4
Sub-contracting
without Payment of Excise Duty
When you issue materials to a subcontractor, you need to keep
track of what materials you have issued and when they have to be returned by.
The reason for this close
monitoring has to do with India’s tax law. Under excise law 57AC, when you send
materials to a subcontractor for processing, you are not required to pay any
excise duty, even though the materials have left your premises. However, if the
materials have not been returned to you within a given length of time specified
by the law (in 2000, 180 days), you will have to reverse any excise credit that
you posted when you purchased the materials. In the case of materials that you
have manufactured in-house, you will have to post credit entries to the extent
of the CENVAT rate of the assessable value of the materials.
1.4.1 Create Sub-Contracting Purchase order with Reference of Purchase
Requisition
To create a subcontract order, proceed as follows:
1. Purchase Requisition will create automatically through Maintenance
Order (IW31)
2. Purchase Requisition will have the reference of Maintenance Order.
3. Create Purchase Order with reference of Purchase Requisition (ME21N)
4.
Release the Purchase Order (ME28)
4. Check and Save the Purchase Order. ![]()
1.4.2 Create Gate Pass (Returnable/ Non Returnable)
for the materials sent out for Fabrication/ Servicing/ Irradiation, etc…
1. Enter Transaction code ZRGP on comm.-and field
2. Select Create from Pull down list, Issue and Purchase Order from another pull down list.
3. Enter the subcontracting purchase order number
4. Enter all the details in the header
5. After posting Gate Pass, to take Print Out, Choose Display à Issue à Gate Pass in ZRGP only, here put Gate Pass No. & press Enter
then choose Edit à Print, Here You can see Print Preview & then take
print out.
1.4.3 Post Goods
Receipt (MIGO) or Service Entry Sheet (ML81N)
Menu Path: Logistics à Materials Management à Inventory management àGoods movement à goods receipt à for purchase orderà Purchase order no. Known (MIGO)
Enter the Purchase Order number
& Create Service Entry Sheet as per the Method suggested in User Manual of
Services.
1.4.4 Reconcile Gate
Pass
1. Enter the Transaction code ZRPP on
command field
1.4.5
Gate Pass Reports
You use this report to get a list of Gate Pass (subcontracting
challans). Depending on what selection criteria you enter, you can use it for
finding out:
Enter Transaction code ZRGP on Command Field
a) Which challans are still with the
subcontractor and are due back the following week
b) Which challans you can make a re credit
for
c) Quantity issued to Vendor
d) Quantity Received from Vendor
1.4.6 Change Gate Pass
Enter the Transaction Code ZRGP on
Command Field
Enter the challan number select ![]()
The challan is displayed.
1.4.7Display Gate Pass
Enter the Transaction Code ZRGP on
Command Field
Enter the challan number select ![]()
The challan is displayed.
SUBCONTRACTING SCENERIO (SLITTING
PURPOSE)
Crate a PO putting Item Category L. Put the
Material which will come from the Vendor Site.
Then Goto MB1B Transaction
Click on to Purchase Order. Put the Purchase Order. Then Click on Adopt
Details.
Put The Batch No here, which
you are going to provide to the Vendor. Then save it. Note Down the Material
Document NO (490000000684)
If it is Excisable then Create a Subcontracting Challan (J1IF01). In Subcontracting challan creation put the Material Document which is created during the MB1B code(490000000684).
If the Material Assessable Value isn’t maintained then maintain it on J1ID.
Then Post the Document.
After Doing all these thing Repeat the Step for creating a Returnable Gate Pass, which has been already described. Then Perform the Gate Entry as Mentioned above. Do the GR in MIGO (T code). Put the Purchase order no.
Enter the Quantity, Batch no for the Incoming as well as Consumed
Material.
Reconciliation of Subcontracting Challan (J1IFQ)
Enter the Material Document which was created during GR
(5000000274)
1.5 Procedure for Claiming
CVD benefit for Imported Material.
1.5.1 Create Purchase
order for imports
Create a purchase order for the materials that you want to order
using the standard procedure as mentioned in above documentation but when you
fill out the item information.
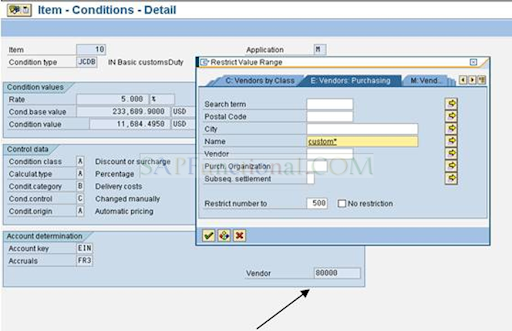
Conditions tab
Select the
countervailing duty (CVD) condition .
a. In the Rate
field, enter the Rate of CVD that will be levied on the material when it
arrives at customs.
b. In the Vendor field,
enter the vendor master record that you have created for the customs office.
To do this, select the CVD condition, which is
marked by arrow, and then press button ![]() in
the conditions tab.Enter the custom vendor number in the vendor
field.
in
the conditions tab.Enter the custom vendor number in the vendor
field.
Enter the custom vendor number in the vendor field.
The vendor ships the goods to you.
When the goods arrive in India, they go through customs. The
customs officers issue a bill of entry for the goods, which is in effect an
invoice for the CVD on the goods. Once they have inspected the goods, they send
them on to you.
1.5.2 Entering invoices for Bill of Entry
(MIRO)
The goods arrive at your
plant, together with the bill of entry. In order to record the bill of entry in
the system
The excise clerk enters
an invoice for the bill of entry.
To enter the invoice for bill of entry follow
standard invoice verification procedure but make sure you observe following
Header Data
- Basic data
tab
- In the Amount field,
enter the amount of countervailing duty (CVD) stated on the bill of entry
in rupees. Also enter the amount of other custom duties if any.
- Do not enter any other taxes.
On the PO reference tab, enter data as follows:
Enter the number of the purchase order related to this delivery.
If you only created one purchase order for the goods, enter
the purchase order number and select planned delivery costs.
If you sent more than one purchase order to the vendor and
it sent you all of the ordered materials together in one shipment:
ii. Enter all of the purchase order numbers in the table.
iii. Select planned delivery costs.
iv. Select Deliveries and deselect Returns.

In both cases, the system displays the line items in the line item
overview
For each line item:
In the Amount field, enter the amount of
CVD on the item (if you have more than one item, you may have to work the
amount out manually).
In the Quantity field, enter the quantity
of goods on the invoice.
Enter a zero-rated tax code.
A dialog box appears with a list of the postings that will be made
to Financial Accounting (FI).
Note down the document
number (CUSTOM Invoice number)
Perform The Gate Entry
Process As per above Mentioned
1.5.3 Capturing Excise invoice (Bill of
Entry)– (J1IEX)
Menu path: India ® Excise Invoice ® Procurement ®Localisation menu (J1ILN)
Capture/Display.® Individual Processing ®Incoming Excise Invoice
In the top line:
Select Capture Excise Invoice
Select Purchase Order.
Enter the purchase order related to the bill of
entry.
Choose ![]()
A dialog box appears.
3.
Enter the number of the
invoice that you entered for the bill of entry and choose ![]()
If you need to enter any other purchase orders, enter the number
in the top line as for step 3.
Note that this time; you do not need to enter the invoice number.
Enter other data as required.
Note that the countervailing duty is displayed in the basic excise
duty fields.
Enter the bill of entry number and date in the excise invoice
number and Doc date field respectively.
Capture The Excise Invoice By Entering the Vendor Excise Invoice
no at the time of GR
Post Cenvat (J1iEX) By Entering the Invoice no
After doing it, do the Simulation
After Simulation, the system posts the CENVAT (CVD Amount) and
creates a corresponding entry in Part II or the appropriate excise register
1.6 Creation of Excise Registers – (J1I5)
You follow this procedure to create the excise registers.
Three steps are to be followed for creation
and printing of the excise registers
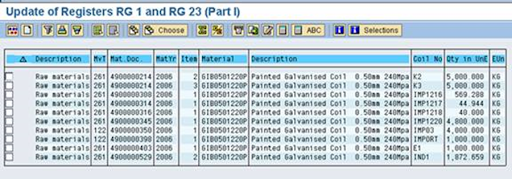
1.6.1 Updating of Registers (RG23 A).
The
updating of registers includes receipts and issues.
The classification of receipts and issues is done by selecting the appropriate classification as per the table given below.
1.6.1.1 Receipt updating of Registers (RG23A)
Menu Path: India Localisation menu
(J1ILN) à Indirect Taxes ->
Registers ->Excise Tax -> Update RG 23A/C Issues and RG 1.
On the selection screen, you specify
- Which
documents you want to cover:
- Enter
general organizational details in the Company details group box.
- Enter
details about the documents that you want to include in the register, in
the Document header and Document details group boxes.
Select movement type 101 and storage
location.
Also select appropriate classification type
(RMA) in case of receipt from manufacture.
Select register RG23 A, in the Registers group box
First select entries & click on Simulate ![]() icon.
icon.
The signal becomes ![]()
Then put tick in checkbox and select ![]() for
updating the register.
for
updating the register.
Register is updated and the screen looks as
given below.
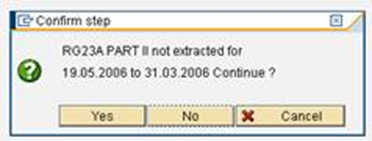
1.6.2 Data Extraction– J2I5
Menu
path: India localization menu à Indirect taxes à Registers à Excise Tax à Extract (J2I5)
On
the selection screen enter the excise group, start date (of the month) and end
date (of the month) and select the registers for which the data extraction is
required.
1.6.3 Register printout– J2I6
You use this report to print out your excise registers.
Menu
path: India localisation menu à indirect taxes à Registers à Excise Tax à Print utility program (J2I6)
On
the selection screen select the registers which are to be printed.
Select
![]()
On the selection screen select the excise
group, start date (of the month) and end date (of the month).
Select
![]()
Select suitable printer and print the
register.
1.7 Procedure for creating Excise Invoice for vendor returns
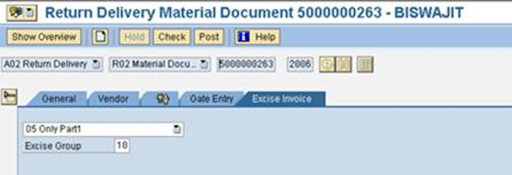
1.7.1 Create Return Delivery
Documents through MIGO
Menu Path: Logistics à Materials Management à Inventory Management à Goods Movement à MIGO-Goods Movement (MIGO)
Indicates the business transaction that you want to enter in the system and give the Original GRN Document number
Enter the Quantity to be return on Quantity Tab
Enter the Reason for movement on where Tab and movement type is 122 for Return Delivery to vendor
Select the Goods Issue Indicator IPD
Check and Post the Document
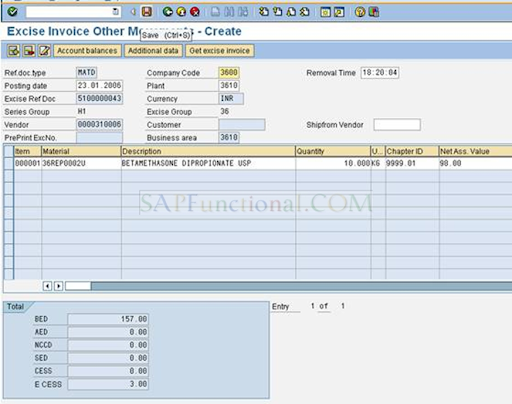
1.7.3 Create and Post Excise
Invoice for vendor with ref of Return Delivery Documents
Menu path: India localisation menu à Indirect taxes à Sales/Outbound Movements à Excise Invoice à For Other Movements à Excise Invoice for Other Movements (J1IS)
Here Click on Create Icon first to create Outgoing
Excise Invoice
Enter the Reference document number, Reference
document type, Document year, and Series group, Excise group and Vendor number.
For the material the Net Assessable Value, Base Value and all Excise duties will pick automatically from Vendor’s Excise Invoice captured & posted already at the time of GRN.
1. LR No.
2. Vehicle No.
Here select each option to maintain the desired data
as following & click on “Details” icon.
Here maintain desired data as per your requirement & save the text
After saving you will get following result. Note down the Excise Invoice No.
Here click on accounting tab to see the Accounting
Entries generated.
Menu path: India localisation menu à Indirect taxes à Sales/Outbound Movements à Excise Invoice à For Other Movements à Post and Print (J1IV)
Enter the Series group, Output type JEXC (Standard)
and Excise Transaction Type is OTHR and Execute
Select the Excise invoice number
to get Print.














No comments:
Post a Comment